This informative guide will walk you through how to set up SPF and DKIM for your Microsoft 365 using the EasySPF and Managed DKIM solutions.
Proper configuration helps prevent spam from being sent using your domain and significantly improves your email security.
To get started, Microsoft requires you to configure specific DNS records for your domain, namely the Microsoft 365 SPF (formerly known as the O365 SPF record) and DKIM records.
- SPF allows receiving mail servers to verify that emails from your domain are sent by authorized servers.
- DKIM attaches a digital signature to each email, enabling receiving servers to detect whether the message was tampered with or spoofed during delivery.
How to set up SPF for Microsoft 365 using the EasySPF
1. Navigate to EasySPF and click the “Add source” button

2. Write Microsoft 365 in the “Source Name” box, after which the system will autofill the SPF mechanism of Google in the relevant boxes.
You can add notes in the “Notes” box if needed. Once done, click the “Add” button.

Note: Make sure to click the “Save Record” button every time after making any changes in the EasySPF.

How to set up DKIM for Microsoft 365 using the Managed DKIM
1. Go to the DKIM Page from your Microsoft 365 Defender portal >> select your organizational domain name, and click “Enable”.

2. Once you click on the “Enable” button, a new pop-up window will appear with the applicable CNAME Records.

To summarize, this contains 2 separate CNAME Records, which look like this:
Type: CNAME
Host Name: selector1._domainkey
Value: selector1-yourdomain-com._domainkey.tenantdomain.onmicrosoft.com (This part is UNIQUE to each domain)
Type: CNAME
Host Name: selector2._domainkey
Value: selector2-yourdomain-com._domainkey.tenantdomain.onmicrosoft.com (This part is UNIQUE to each domain)
3. Copy these 2 CNAME Values
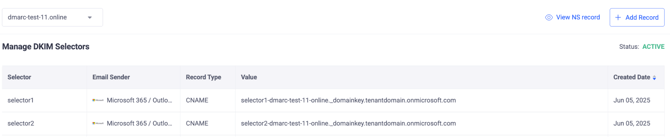
4. Navigate to the Managed DKIM in EasyDMARC and click the “Add Record” button

5. Enter Microsoft 365 in the “Email Sender” box, after which the system will provide the quantity of records, which is 2 for Microsoft 365 DKIM. It will also automatically choose the records’ type as CNAME and autofill the DKIM selectors for you.

6. Input in the “Value” boxes the DKIM record values copied from the Microsoft 365 Defender portal, and click the “Add” button

7. Once the 2 CNAME Records are implemented into your Managed DKIM, go back to your Microsoft 365 Defender portal and re-click the “Enable” button. If everything has been configured correctly, you’ll get to see the green check with the “Enabled” notification.

Note: The records may take a bit of time until they are properly propagated.
Congratulations! You have now set up SPF and DKIM for Microsoft using the EasySPF and Managed DKIM solutions.
In case you have any further questions, feel free to reach out to EasyDMARC technical support.