How to Update Your DMARC Policy: A Step-by-Step Guide
Updating your DMARC policy is essential to maintaining control over your domain’s email authentication. A DMARC policy ensures that unauthorized emails claiming to be from your domain are identified and handled appropriately. Here’s a guide to updating your DMARC policy, whether you’re working with a standard TXT record or using our Managed DMARC solution.
Updating a DMARC Policy in a TXT Record.
If your DMARC record is set up as a TXT record in your DNS, you’ll need to make changes directly in the DNS zone:
- Go to your DNS provider’s platform, access your domain’s DNS zone, and locate the DMARC TXT record.

- none – No action, just monitoring.
- quarantine – Flag failed emails as spam or send them to the junk folder.
- reject – Block emails that fail DMARC from being delivered.
Updating a DMARC Policy with Managed DMARC (CNAME Method).
If you’re using our Managed DMARC solution, updating your DMARC policy is even easier. With our solution, a DMARC CNAME record is added to your DNS zone, allowing you to control your DMARC settings directly from our dashboard.
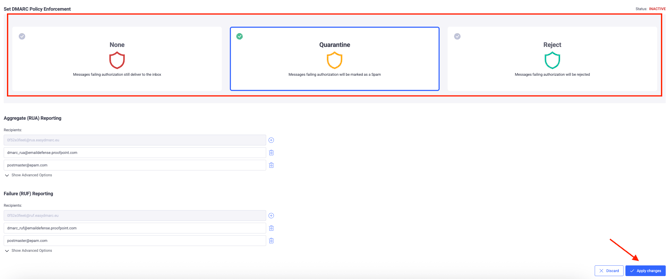
- Log in to your account and go to the Managed DMARC section.
- Select the DMARC policy level you want to apply to your domain (none, quarantine, or reject).

3. Click on “Apply Changes” after selecting your policy. This step is crucial, it triggers an automatic update to your DNS zone, applying the changes without any need for manual DNS editing.
Additional Tips for Managing Your DMARC Policy.
- Start with “none” for monitoring. When implementing DMARC for the first time, it’s a good practice to start with the “none” policy. This allows you to monitor DMARC reports and ensure all legitimate sources are properly configured and are DMARC compliant.
- Once you’re confident that all your legitimate email sources are properly configured, you can gradually move to stricter policies, such as “quarantine” or “reject,” to improve email security.