Network Solutions, one of the pioneers in domain registration, offers a range of DNS management tools. With its DNS management system, Network Solutions provides options to configure essential email authentication records, such as DMARC, which enhances email security by helping prevent unauthorized use of the domain.
Important to note:
Domain DNS record changes may take 24-48 hours to update throughout the internet, also called propagation. Updates may resolve faster at some locations than others because many nameservers on the internet retrieve updates at different times.
Publishing a CNAME type DMARC record in Network Solutions
When using the Managed DMARC solution of EasyDMARC, the type of DMARC record that should be added to the DNS is CNAME.
A CNAME (canonical name) Record is a DNS record that can create an alias for the domain and allow traffic for the domain name to be redirected elsewhere.
Below are the tips on how to publish a CNAME-type DMARC record in the Network Solutions DNS zone:
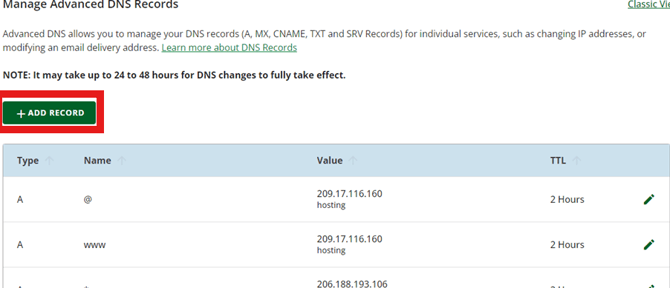
1. Log in to your Account Manager
2. Click on Domains on the left side of the page and choose the domain name that you want to update details for (If you have only one domain, you will be redirected to that Domain Details page directly)
3. On the domain page, go down to the Advanced Tools section.

4. Click Manage next to Advanced DNS Records

a. To add a CNAME record: Click “+Add Record” and choose the type as CNAME
b. To edit records: Scroll down to the CNAME/TXT record you want to manage and click on the edit (pencil) icon.
6. Select Refers to from the drop-down menu where you can choose @, www, or Other Host (if you choose Other Host, you will be asked to enter the Host Name). You will need to choose Other Host in order to publish the right record.

7. Once you click on Other Hosts you will need to add the hostname as _dmarc
8. Paste the value that you copied from EasyDMARC in the Alias To section.
9. Click the Add button.
Publishing a TXT-type DMARC record in Network Solutions
On the other hand, you can publish a TXT-type DMARC record which can be created by EasyDMARC’s DMARC generator tool. TXT Records have several functions. One common function is creating a DMARC record.
Below you will find the detailed steps for adding a TXT-type DMARC record in Network Solutions.
First, navigate to your Network Solutions account.
- Select Domains from the menu.
- Select the domain name you want to change.
- On the domain page, go down to the Advanced Tools section.
- Click Manage next to Advanced DNS Records.
- Click +Add Record.
- Here you will add the TXT record:
Type:
TXT
Refers to:
Select Other Host, then enter _dmarc
TXT Value:
"v=DMARC1; p=none; rua=mailto:example@example.com"
Note: Replace the "v=DMARC1; p=none; rua=mailto:example@example.com" with the TXT-type DMARC record you generated for your domain.
TTL:
60 (1 minute - so that you do not need to wait too long before verifying)

8. Click the Add button.
9. Wait for a few minutes, then you can verify that you have the correct record entered using EasyDMARC’s DMARC record checker.
By following these guides, you’ll be able to easily configure your DMARC record in the Network Solutions DNS zone which is crucial from the point of safeguarding your domain. If there are still questions or concerns that remain uncovered after checking this article, you can contact EasyDMARC Technical Support.