Initial steps to get set up with EasyDMARC
Adding your domain to the dashboard is the first step in monitoring and analyzing your email authentication setup. By connecting your domain, you can track DMARC reports, identify potential issues, and improve email deliverability. In this guide, we'll walk you through the process to ensure a smooth setup.
During the process of creating your account, you will reach a page where the platform will ask you to add your domain, as shown in the screenshot below. Make sure to add your domain(s).
Now, the platform will provide you with two options to add a DMARC record with our RUA and RUF tags. This is a very important step required for us to start receiving and monitoring DMARC reports.
Option 1: Adding a DMARC record using our Managed DMARC. This is a DMARC record with a CNAME type, meaning that once you choose this option, which is strongly recommended, you will be able to manage your DMARC record directly from EasyDMARC rather than the DNS zone. It is a one-time change, and after that, all DMARC management will be done from EasyDMARC.
In case you choose this option, follow the steps below to add the record to your DNS.
Important note: If you have an existing DMARC record, make sure to remove it before adding the new one provided by EasyDMARC.
We’re using Cloudflare as an example.
As shown in the screenshot below, this is how the record should look in the DNS zone. If your DNS zone is also with Cloudflare, like mine, make sure to toggle off the proxy.
After adding the record, click the verify button.
Please note that DNS propagation may take some time.
Once the record has propagated, you will see the successes in green as shown in the screenshot below.
Option 2: Manage from DNS Host. This is mainly known as a manual record since it is a TXT record. If you choose this option, any future DMARC record changes can only be made manually from the DNS zone.
In case you choose this option, follow the steps below to add the record to your DNS.
Important note: If you have an existing DMARC record, make sure to remove it before adding the new one provided by EasyDMARC.
I'm using Cloudflare as an example.
As shown in the screenshot below, this is how the record should look in the DNS zone.
After adding the record, click the verify button.
Please note that DNS propagation may take some time.
Once the record has propagated, you will see the successes in green as shown in the screenshot below.
Once you have added the domain and verified it, EasyDMARC reporting will be active, and you will be able to receive your domain's DMARC reports in the EasyDMARC dashboard.
Please note that after verifying the domain, the first DMARC aggregate reports will be visible in the EasyDMARC dashboard within 72 hours. This initial delay only applies to the very first reports. Once those first reports show up, the data will be updated consistently every 24 hours moving forward.
Note: When initiating the DMARC project, make sure to start with the policy as “p=none”, due to the best practices.
This is also known as the monitoring mode, which will allow you to receive your domain’s DMARC reports, analyze them, and go over the configurations accordingly. In the meantime, you will make sure that your legitimate emails are not getting quarantined or rejected because of the DMARC policy.
Here is what it should look like when using a TXT-type DMARC record:
And here the setup of the “p=none” policy when you have activated the Managed DMARC solution for your domain:
Once the domain is added, you will be redirected to the “Domains and Groups” page.
This page will provide you with comprehensive information regarding your domain, as well as with pending actions, completing which you will enhance your domain’s security. In case the system detects any issues with your DMARC, SPF, or DKIM records, it will automatically add pending actions for the domain so you can fix the records.
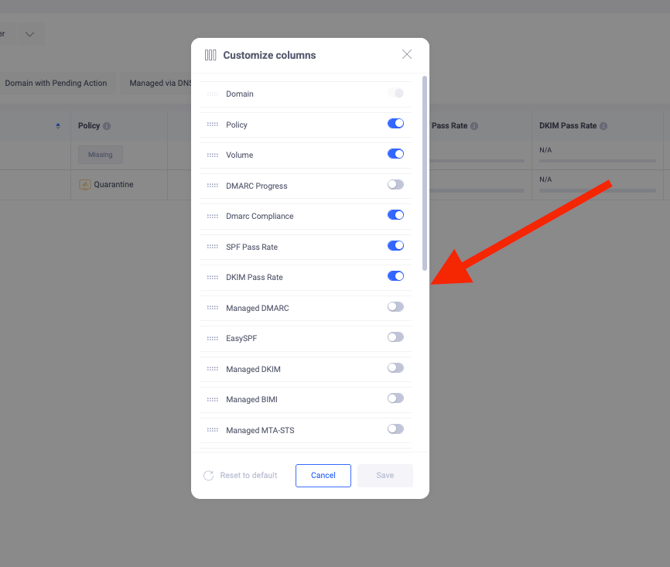
On the “Domains and Groups” page, each domain is displayed along with its corresponding statuses across multiple columns. These statuses represent different aspects of the domain, such as DMARC policy, SPF/DKIM pass rates, email volume, and other related indicators. You can also customize the visible columns to display additional statuses based on your requirements.
Additionally, the system provides pending actions with different criteria and severity levels for each domain. You can navigate to the pending actions list for a domain by clicking on the red triangle sign next to the domain. These pending actions help you take full advantage of EasyDMARC’s features and resolve any issues related to your DMARC, SPF, or DKIM configurations.
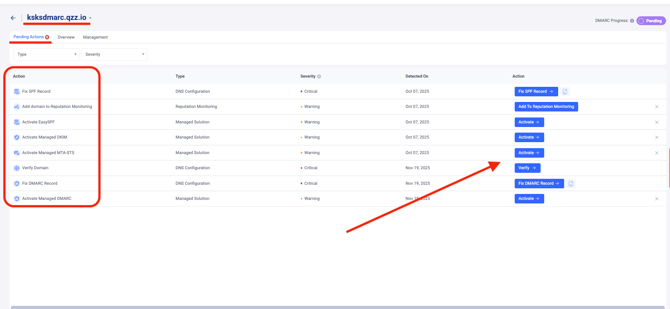
Below is the list of pending actions for a domain when it’s newly added and nothing is set up for it, with the severity level of actions and explanation:
1. Verify Domain - Critical
The first thing required to be done when the domain is added to EasyDMARC is to verify it. The verification requires publishing a DMARC record, which would include EasyDMARC’s DMARC reporting addresses (RUA and RUF), so EasyDMARC can receive the domain’s DMARC reports and parse them for you.

When clicking the “verify” button, the system will provide you with two options for domain verification:
1.Domain verification by activating the Managed DMARC solution.
2.The other option is to publish a TXT-type DMARC record, which will include EasyDMARC’s RUA and RUF addresses.
See the detailed activation process above.
2. Fix SPF record - Critical
The next critical pending action is to fix the SPF record, which is one of the main email security protocols. If the system has identified no SPF record for your domain or any issues with your existing SPF record, it will provide you with this pending action.
By clicking the “Fix SPF Record”, the system will provide you with the EasySPF record, which should be published in your DNS zone. Once done, EasySPF will be activated for your domain, along with the record being fixed. After this, you will be able to manage your domain’s SPF record directly from EasyDMARC. EasySPF will also provide you with additional visibility over the usage of your sending sources.
Next to the “Fix SPF record” button, you can click on the “Lookup” icon, which will redirect you to the EasySPF checker tool. Here you will see the reason why your SPF record failed validation and why it needs to be fixed.
3. Fix DKIM record - Critical
EasyDMARC has an in-house DKIM selectors’ database against which it performs the checks.
If the system has detected a DKIM record that has issues, it will provide you with this action.
By clicking the “Fix DKIM Record” button, a pop-up will appear, starting the process of the Managed DKIM solution.
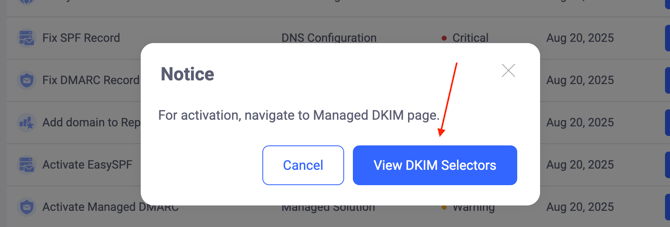
To activate Managed DKIM, you will need to click the “View DKIM Selectors” button. You will then be redirected to the Managed DKIM page, where your DKIM selectors will be detected by the system. Double-check the selectors and adjust the list if needed. Once done, activate the Managed DKIM solution by publishing the NS-type record provided by the system.
You also have the lookup button next to the “Fix DKIM Record” button, which will redirect you to the DKIM checker tool. Here you will be able to check for your DKIM records and see why they fail the validation.
4. Fix DMARC record - Critical
If you have completed the “Verify Domain” action properly, then this action will not show up for your domain. However, if you verified the domain in the first step but still see the “Fix DMARC record” pending action, check the record by performing a DMARC lookup to see if there are any issues with the record:
The lookup tool will show exactly if there are any issues with your DMARC record so you can move forward with fixing it.
5. Add domain to Reputation Monitoring - Warning / Optional
By completing this pending action, you will add the domain to EasyDMARC’s Reputation Monitoring tool. Once the domain is added to Reputation Monitoring, the EasyDMARC system will automatically check and alert you if your domain appears on any blacklist.
Note: To delist a domain, you’ll need to contact the blacklist provider directly via the provided link.
You can skip this action by clicking the “x” button next to the “Add To Reputation Monitoring” button if you want to.
6. Activate EasySPF - Warning / Optional
In case you have activated EasySPF when fixing the SPF record, then this action will not appear on your dashboard. However, if the EasySPF was not activated when fixing the SPF record, you can activate it by clicking the “Activate” button.![]()
The system will provide you with a TXT-type SPF record to add to your DNS zone and activate the EasySPF solution for the domain. However, make sure to navigate to EasySPF and double-check your sending sources detected by the system. If any sending sources are missing, add them manually and then activate EasySPF to avoid SPF failures when sending out emails.
7. Activate Managed DMARC - Warning / Optional
In case you have activated Managed DMARC when verifying the domain or fixing the DMARC record, then this action will not appear on your dashboard. However, if the Managed DMARC was not activated, you can activate it by clicking the “Activate” button.
You can skip this action by clicking the “x” button next to the “Activate” button if you want to.
8. Activate Managed DKIM - Warning / Optional
In case you have activated Managed DKIM when fixing the DKIM record, then this action will not appear on your dashboard. However, if the Managed DKIM was not activated, you can activate it by clicking the “Activate” button.
You can skip this action by clicking the “x” button next to the “Activate” button if you want to.
9. Activate Managed MTA-STS - Warning / Optional
If you have configured MTA-STS for your domain, you can consider activating the Managed MTA-STS solution, which will allow you to manage your MTA-STS settings from inside your EasyDMARC account as well, and you’ll be able to receive the TLS reports to the EasyDMARC dashboard and analyze them here.
On the other hand, if you don’t even have MTA-STS configured, you can set up MTA-STS and TLS reporting from scratch by activating the Manafed MTA-STS solution for your domain. 
Note: MTA-STS is not yet broadly adopted by the majority of domains and is mostly implemented by banking and governmental domains. It applies to incoming mail and ensures that messages are only accepted over secure TLS connections.
You can skip this action by clicking the “x” button next to the “Activate” button if you want to.
Overview and Management
Besides the “Pending actions”, there are also two additional subsections in this page, which are the “Overview” and the “Management” sections.
Under the “Overview”, you will see a more detailed view per domain, which will include:
1. DMARC compliance rate, along with DKIM and SPF pass rates
2. The domain’s email volume distribution by compliance
3. The domain scanner results of the domain
4. The DNS record statuses (DMARC, SPF and DKIM)
5. Option to get redirected to the Aggregate reports’ section of the domain, and the button to get redirected to the domain scanner
The “Management” tab represents such details as:
1. The domain type - sending or parked
2. The domain group
3. The domain’s label
4. The users who have access to that domain and the option to manage access
5. The alerts that are set up for that domain, with an option to add alerts
6. The EasyDMARC solutions and features that were activated for the domain or are yet to be activated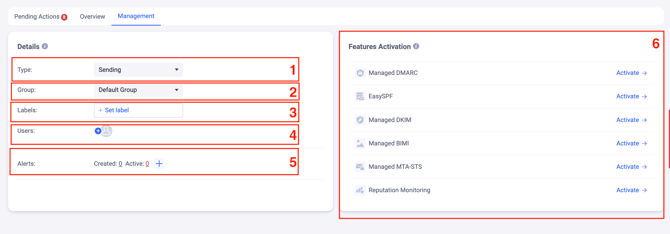
For a more detailed explanation of all available statuses and features on this page, refer to the following guide:
Navigating through the “Domains and Groups” page
Monitoring and Analyzing the DMARC reports
Now, when you have added and verified your domain in EasyDMARC, you can receive your DMARC reports to the EasyDMARC platform.
DMARC reports come in two main types: Aggregate reports and Failure (forensic) reports.
Aggregate reports give a high-level summary of all messages sent from a domain, showing how many passed or failed DMARC, their delivery status (delivered, sent to spam, or rejected), sending IPs, and SPF/DKIM authentication and alignment results. These reports are generated every 24 hours.
Failure reports, in contrast, provide detailed information about individual messages that failed DMARC, including headers and authentication results. These also include sensitive data such as the sender and recipient addresses, the subject line of the email, as well as the message headers. Failure reports are generated instantly when triggered.
Note: Since most ISPs don’t support failure reports due to privacy concerns, domain owners should mainly rely on aggregate reports for monitoring.
Analyzing both types of reports will help you spot unauthorized senders, verify that legitimate services are properly authenticated, detect configuration gaps in SPF or DKIM, and understand how your messages are being treated by receiving mail servers.
This visibility allows for quicker troubleshooting, better protection against spoofing, and smoother progression toward a strict DMARC policy.
DMARC aggregate reports are originally reported in a complicated XML format and are generated every 24 hours. Our system parses these reports into easy-to-read and easy-to-understand data.
You will find the detailed guidance on how to analyze the DMARC aggregate reports in EasyDMARC, referring to the following link:
Analyzing DMARC Aggregate Reports
On the other hand, the DMARC Failure/Forensic reports are generated and sent almost instantly by mailbox providers when an email fails DMARC authentication in EML format.
Our system also parses the DMARC Failure reports to simplify the investigation.
Learn how to analyze the Failure Reports dashboard and understand everything you need, following the details in this article:
Analyzing DMARC Failure Reports
Managing SPF and DKIM records
SPF and DKIM are the backbone of email authentication, and keeping the records properly configured is key to ensuring smooth email delivery. By reviewing your DMARC reports, you can quickly identify misconfigurations, missing senders, or unauthorized sources and then fine-tune your SPF and DKIM records to align with your legitimate email streams. This ongoing adjustment process not only improves your domain’s security but also helps maintain trust and deliverability.
To check your SPF and DKIM records for any validation failures, you can use EasyDMARC’s SPF lookup tool and the DKIM lookup tool.
The tools will provide you with the information on what should be fixed for the records to be properly validated.
1. Adjusting SPF record
SPF records can fail validation for several reasons, including syntax errors or the inherent SPF limitation of 10 DNS lookups.
When using a TXT-type SPF record and receiving validation issues due to syntax, it’s recommended to use EasyDMARC’s SPF generator tool.
You will only need to insert your domain name and the SPF mechanisms of the sources you use, and the tool will provide you with a proper and valid SPF record to publish in your DNS zone:
View the example below:


Publish the newly generated record if you still don’t have any SPF record in place, or instead of the existing one that had validation issues.
For details on SPF configuration for specific sending sources, please refer to the EasyDMARC knowledge center.
Relevant articles:
How do I implement SPF for my domain?
Resolving the Issue of Duplicate SPF Records for Your Domain
How to Troubleshoot SPF-Related Bounce-Backs
Now, let’s deep dive into SPF’s main limitation - the SPF 10 DNS lookup limitation
SPF has a 10 DNS lookup limitation, which can limit the complexity and flexibility of the SPF Record.
It’s quite easy to exceed the 10 DNS lookups by using just a few sending sources:
However, you can overcome this limitation by implementing EasyDMARC’s EasySPF solution for your domain.
It’s a dynamic solution that flattens the include mechanisms into IP addresses so that you’ll avoid exceeding the 10 DNS lookup limitation. EasySPF will automatically check for any IP rotations within the include mechanisms of your sending sources every few minutes and update the record accordingly, and make sure your SPF record is always up to date.
In addition to that, going forward, you can also manage your SPF record directly from the platform rather than the DNS zone.
Along with the above-mentioned features, the EasySPF is merged with your Aggregate reports in EasyDMARC, providing you with more visibility on the usage of your sending sources. This additional visibility will ease your SPF record management in the future.
To activate the EasySPF solution for your domain, find the details in the following article:
Setting up EasySPF
Note: A domain should have only one SPF record, so make sure that once the EasySPF record is published, the old one is removed from the DNS.
2. Adjusting DKIM records
Unlike SPF, where a domain can publish only one record that must include all authorized sending sources, DKIM works differently. Each sending service or server generates its own unique DKIM key pair, and the corresponding public key is published in your domain’s DNS. This means you may have multiple DKIM records under different selectors, allowing each service to handle signing independently.
When managing your DKIM records manually in the DNS and identifying any DKIM failures for your sending sources, you can use EasyDMARC’s DKIM checker tool to see if the relevant DKIM record was published for your domain.
Example case: A domain uses Microsoft to send out emails, and DKIM on emails is failing the checks. By navigating to the DKIM checker tool, inserting the domain and Microsoft’s selector(selector1 or selector2), the tool will show if the relevant record with the needed selector was published:
Now that we have identified that the records are not published, we can search for the required sending source’s configuration article in EasyDMARC’s knowledge center, find the DKIM setup guide for Microsoft, and go over the configuration steps.
Once the configuration is complete, we can use EasyDMARC’s email investigation tool to test the setup and make sure everything is good to go.
Relevant articles:
Steps to configure DKIM for my domain
Resolving DKIM Failures: A Comprehensive Troubleshooting Guide
Managed DKIM
EasyDMARC also provides a Managed DKIM solution, designed to simplify record management across multiple sources. Like our other managed solutions, it only requires a one-time DNS configuration to activate. Once enabled, all your DKIM records are consolidated into a single, easy-to-manage page within EasyDMARC. The system can automatically detect a sending source’s DKIM specifications by simply entering the source name, setting the correct record type and selector for services already available in our database. From there, you only need to add the public key value and save the record.
Activate the Managed DKIM solution to be able to manage your DKIM records directly from the EasyDMARC platform, following the steps in this guide:
Activating Managed DKIM
Now it’s time to keep an eye on the DMARC reports and monitor them to identify any possible misconfigurations and make sure those are fixed
Monitoring your DMARC reports with EasyDMARC is simple and effective. Instead of digging through complex XML files, the system turns your data into clear, actionable insights that help you stay in control of your email ecosystem:
- Human-readable format: EasyDMARC automatically gathers the XML DMARC reports and parses them into easy-to-read visuals.
- Sender visibility: Quickly see who is sending emails on behalf of your domain.
- Authentication tracking: Check which messages passed or failed SPF, DKIM, and DMARC.
- Unauthorized sources: Detect if outsiders are trying to spoof your domain.
- Legitimate senders failing: Spot when trusted services fail checks, so you know the setup needs revision.
- New services detection: Identify newly appearing sources and decide whether to authorize or block them.
Here are the configuration articles for the top 5 sending sources when managing the records in your DNS zone, as well as when using EasyDMARC’s managed solutions:
Microsoft 365
SPF and DKIM setup for Microsoft 365
Microsoft 365 setup via EasySPF & Managed DKIM
Google Workspace
SPF and DKIM setup for Google Workspace
Google Workspace setup via EasySPF and Managed DKIM
Amazon SES
Amazon SES SPF and DKIM Configuration
Amazon SES setup via EasySPF & Managed DKIM
SendGrid
SendGrid DKIM and SPF Setup: Step-by-Step
SendGrid setup via EasySPF & Managed DKIM
Mailgun
MailGun DKIM and SPF Setup: Step by Step
MailGun setup via EasySPF & Managed DKIM
EasyDMARC offers comprehensive configuration guidance on SPF and DKIM for a wide range of email sources, from popular platforms like Google Workspace, Microsoft 365, and Salesforce to marketing tools, CRMs, and other third-party services. This extensive coverage makes it easier to correctly configure authentication for all your legitimate senders in one place.
So, when analyzing the DMARC reports and identifying any potential misconfigurations, you can find all the available comprehensive configuration articles in the EasyDMARC knowledge center.
DMARC Enforcement
Once you’ve completed the monitoring stage and resolved any issues with SPF and DKIM, the next step is to gradually enforce your DMARC policy. Enforcement is a phased process that helps you secure your domain without disrupting legitimate email traffic.
From “None” to “Quarantine”: After monitoring and ensuring most of your email sources are correctly authenticated, you can move your policy to quarantine. At this stage, emails sent on behalf of your domain that fail DMARC will be redirected to recipients’ spam or junk folders instead of the inbox. This helps reduce abuse of your domain while still allowing you to monitor traffic.
When using a TXT-type DMARC record, consider using the DMARC generator tool when moving to the “p=quarantine” policy. This will allow you to be sure that there are no typos in your updated record:

On the other hand, if the Managed DMARC solution was activated for your domain, all you need is navigating to the Managed DMARC dashboard >> clicking on quarantine policy >> and applying the changes. 
Staying in Quarantine: It is recommended to remain in quarantine for some period of time (usually from 1 to 2 weeks) before moving to reject. This allows you to verify that all legitimate sources are sending correctly, identify and fix any corner cases, and smoothly integrate new email services that may be added to your ecosystem.
Enforcing DMARC to “p=reject”
After successfully monitoring and spending enough time at the quarantine stage, the next step is to move your policy to reject.
The p=reject setting is the strictest DMARC policy and should only be implemented once you are confident that all your legitimate sources are fully compliant. At this level, any email sent on behalf of your domain that fails DMARC will be completely blocked by receiving servers and never delivered to recipients. While this provides the highest level of protection against spoofing and phishing attacks, misconfigurations can also prevent legitimate emails from reaching your customers—so careful preparation is essential.
To minimize risk, it’s recommended to enforce rejection gradually using the pct tag in your DMARC record. For example, you can begin with pct=25 to apply the reject policy to 25% of failed messages, then increase it in steps until you reach full enforcement at 100%.
Use the DMARC generator tool to adjust your TXT-type DMARC record:

Or set up the PCT tag in the Managed DMARC dashboard when the Managed DMARC solution is activated:
This phased approach ensures that if any overlooked sources or misconfigurations remain, they can be corrected before the policy is applied to all of your email traffic.
Related articles:
How do I know whether I'm ready to switch to p=reject?
How to Enforce Your DMARC Policy Without Compromising Legitimate Traffic
Life after p=reject
Reaching the reject stage is a big achievement, but it’s not the end of the process. Email environments are constantly changing. New services may be added, old ones might change the way they operate, and misconfigurations can still happen. That’s why continuous attention is essential even after full enforcement.
Keep reviewing your DMARC reports to:
- Ensure all legitimate sending sources continue to pass authentication.
- Identify and resolve any corner cases or misconfigurations that could affect deliverability.
- Detect unauthorized attempts to use your domain, confirming that your policy is blocking them effectively.
- Stay prepared for changes in your email infrastructure.
Finally, setting up alerts in EasyDMARC helps you stay on top of important changes without needing to constantly check reports manually. Alerts notify you about spikes in failures, any unusual activity, record changes, or record validation failures, ensuring you’re always aware and can act quickly.
Check the following guide to set up alerts in EasyDMARC and make sure you’re always on track:
How to set up alerts
While the DMARC project might sometimes be challenging, the EasyDMARC team is always ready to assist.
Whenever there are any questions, feel free to reach out EasyDMARC experts.