Google Workspace SSO Setup
1. Open your EasyDMARC SSO Portal: https://app.easydmarc.com/settings/security/saml2
2. From your Google Workspace Admin console, open Apps -> Web and mobile apps

3. Add App -> Add custom SAML app

4. Type App Name as “EasyDMARC” and add Icon (Optional)
5. Download IdP Metadata file
6. Head back to your EasyDMARC SSO portal and upload the downloaded Metadata XML file and click on Save

7. Paste the provided Entity ID and Assertion Consumer Service URL from your EasyDMARC SSO Portal to Google Workspace
Important Note: In case you want to enforce SSO for all users, make sure to disable any OAuth logins by heading to Linked Accounts (Google, Microsoft, LinkedIn), and then proceed with the SSO setup.

Important Note: Make sure to use either SP-initiated or IDP-initiated login, as Google does not support adding multiple URLs.

Additionally, input Name ID format as EMAIL, and Name ID as “Basic Information > Primary email”
Important Note: Entity ID must be set as https://uac.easydmarc.com/realms/easydmarc

8. Add Attributes
First name -> firstName
Last name -> lastName
Primary email -> email
9. Once you Finish adding all the details, make sure that the EasyDMARC App is ON for everyone (or for any specified users)

10. Wait for up to 15 minutes, and then click on “Test SAML Login.”
After completing the steps above, please follow the instructions below:
- Log out of your EasyDMARC account.
- Open an incognito/private browsing tab.
- Log in using the application created in your identity provider (IDP).
- You will be redirected to EasyDMARC, where you’ll see a prompt to link your account to SSO.
- Click the link to initiate the account linking process. (as shown in the First Screenshot)
- Check your inbox for an email from EasyDMARC (as shown in the Second Screenshot).
- Click the link in the email to complete the login.


11. Congrats, you’ve activated EasyDMARC SSO for your Google Workspace.
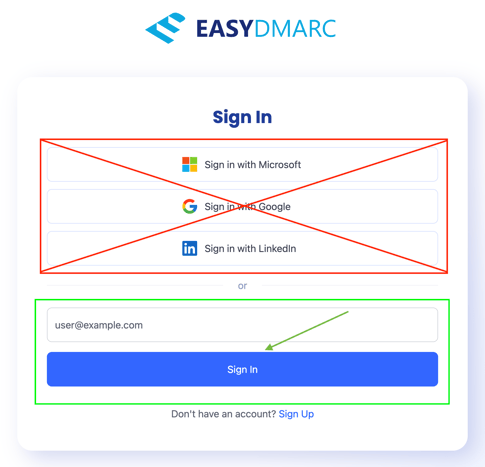
Note: After SSO is set up, avoid using the OAuth login options (Microsoft, Google, LinkedIn) on the EasyDMARC login page. Using them may create a new, separate account. Since your login method is now SSO, simply enter your email address on the EasyDMARC login page and click “Sign in.” The system will redirect you through your configured SSO.
Please make sure to communicate this instruction internally with your team as well.
If you encounter any limitations, please reach out to our Support Team.