
Connect your Microsoft SNDS account to EasyDMARC and track your Outlook and Hotmail sending reputation by IP right in your Sender Insights dashboard.
Before you startData appears in your dashboard 24–48 hours after verification.
To get started, you'll need a Microsoft account (such as an outlook.com address) or a Microsoft 365 admin account to sign in to the SNDS portal. Have your dedicated sending IPv4 addresses or CIDR ranges ready, since you'll request data for the IPs you send from. You'll also need access to abuse@ or postmaster@ at your domain, where Microsoft sends the ownership verification email.
Step 1: Prepare your Microsoft environment
Confirm these three things before you open the SNDS portal.
- You have a Microsoft account (for example, an outlook.com address) or a Microsoft 365 admin account.
- You have the list of dedicated IPv4 addresses or CIDR ranges you send from.
- You can receive mail at an authoritative address for those IPs, such as abuse@yourdomain.com or postmaster@yourdomain.com.
Step 2: Request IP access and verify ownership (if you don't have access to any IPs)
Microsoft only shares data for IPs you prove you control.
- Sign in to the Microsoft SNDS portal.
- Select Request Access and enter your IP ranges or ASN.
- Choose a verification email address from the list Microsoft provides.
- When the email arrives, click the authorization link to confirm ownership.
Note: Data can take 24–48 hours to appear after verification.
Step 3: Enable Automated Data Access (ADA)ADA gives EasySender a private URL to pull your SNDS data automatically.
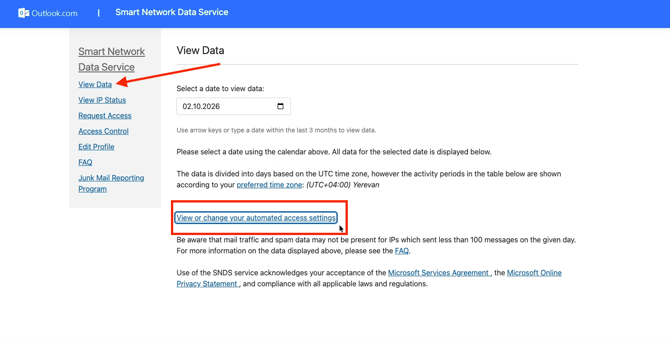
- In the SNDS portal, click View Data in the left menu.
- Select View or change your automated access settings.
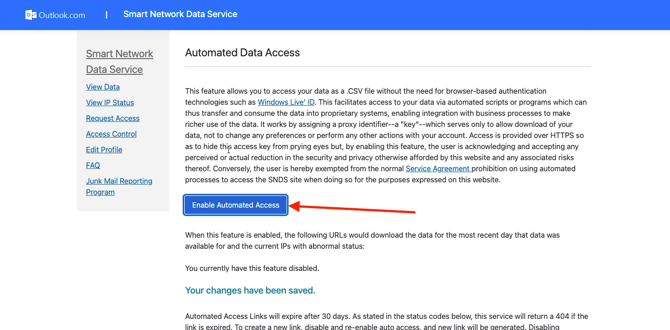
- Click Enable Automated Access.
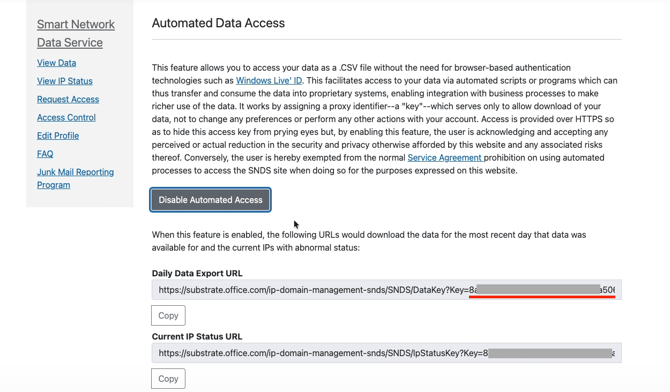
- Copy the key portion from the end of the URL shown.
- Navigate to EasyDMARC >> Sender Insights >> Microsoft SNDS >> initiate the connecction
- The page will redirect you to Microsoft SNDS section in EasyDMARC integrations.
Click “Connect account”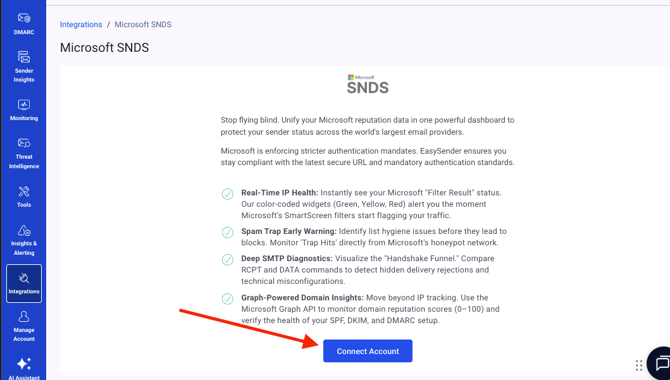
- Paste the key copied from your SNDS account into the Microsoft SNDS Configuration page in EasyDMARC and click “Connect”
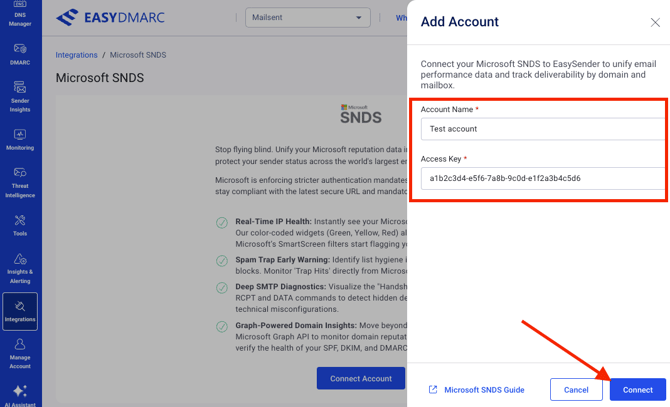
Tip: Treat this key like a password. Anyone who has it can read your SNDS data.
Note: Microsoft’s automated access keys expire after 30 days. Once a key expires, EasyDMARC can no longer pull your SNDS data, and your Sender Insights dashboard will stop updating. To get a new key, go back to your automated access settings in the SNDS portal, disable automated access, then enable it again. Copy the new key from the end of the URL and paste it into the Microsoft SNDS Configuration page in EasyDMARC. Disabling automated access invalidates your old key immediately, so update it in EasyDMARC right away to avoid gaps in your data.
In case you have any questions which are not addressed the guide, please feel free to reach out to EasyDMARC experts.