
This guide walks you through setting up SAML-based Single Sign-On (SSO) between Microsoft Entra ID (formerly Azure Active Directory) and EasyDMARC, so your team can sign in with their existing Microsoft credentials instead of a separate password.
Before you begin, make sure you have administrator access to your Microsoft Entra portal, access to your domain’s DNS settings (to add a TXT verification record), and access to the SSO portal in your EasyDMARC account.
Note that once SSO is enabled, it must be enforced across your entire organization, so plan to share the new login process with your team.
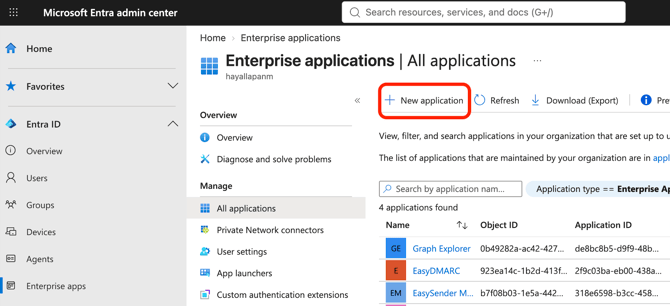
After logging into your Entra portal, go to Home -> Enterprise applications and click "New application"
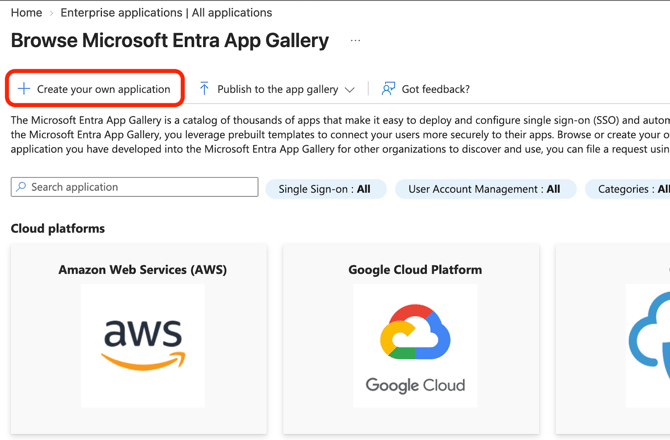
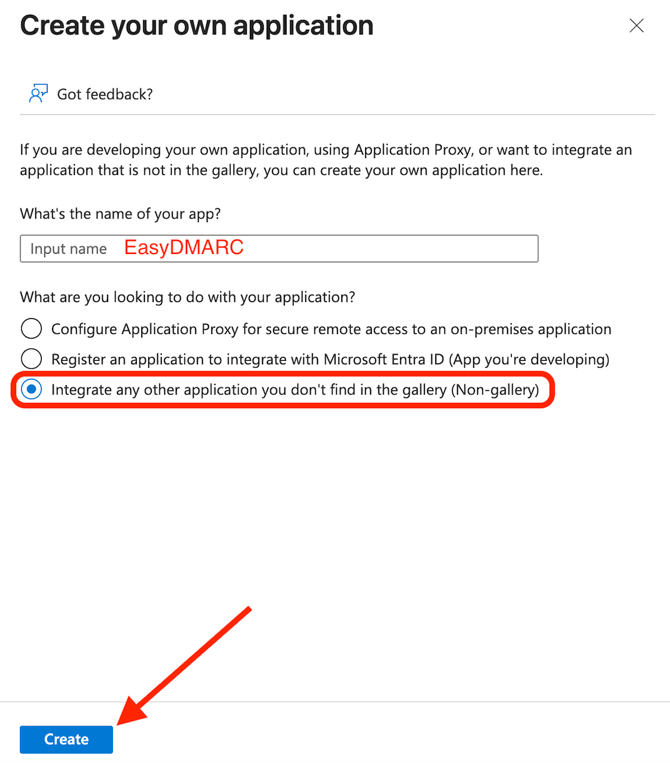
Click "Create your own application", enter the Name, and select Integrate any other application you don’t find in the gallery (Non-gallery), and click "Create"
Click "Set up single sign-on" -> SAML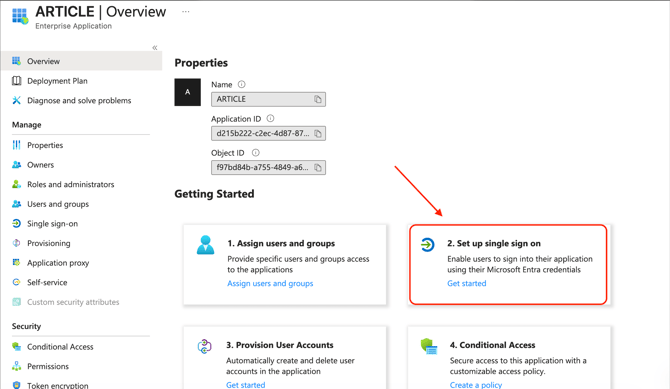
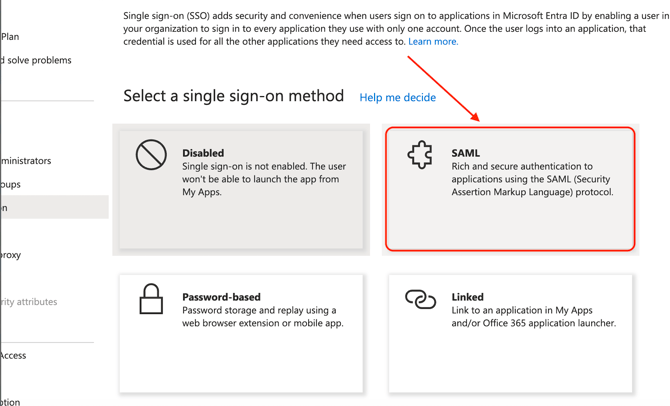
Back in your Azure portal, search for Basic SAML Configuration, and click Edit 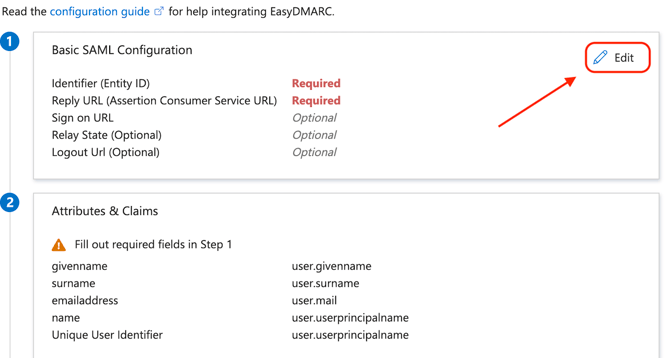
Add the following URL https://uac.easydmarc.com/realms/easydmarc, as seen in the screenshot below. This will then allow you to download the Metadata XML.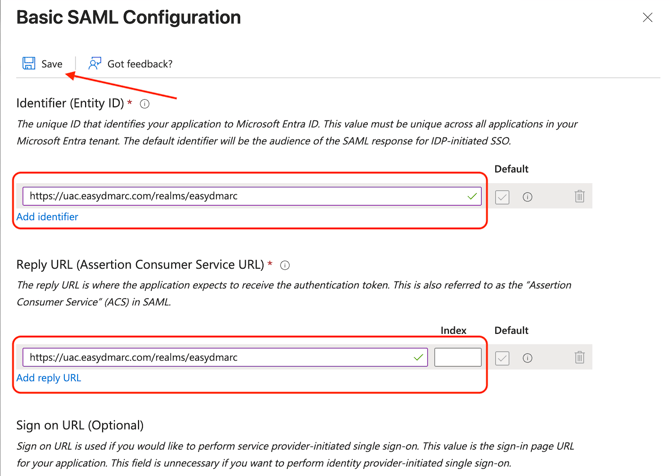
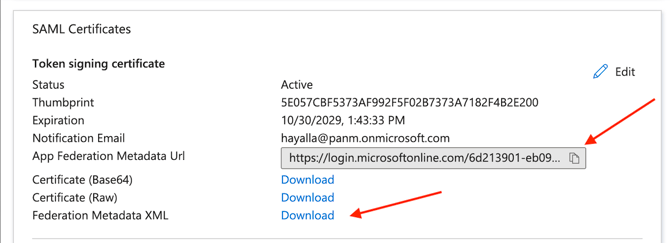
After completing the process above, you will have 2 options: Download the Federation Metadata XML or copy the App Federation Metadata URL
From your EasyDMARC SSO portal, set up your domain and confirm its ownership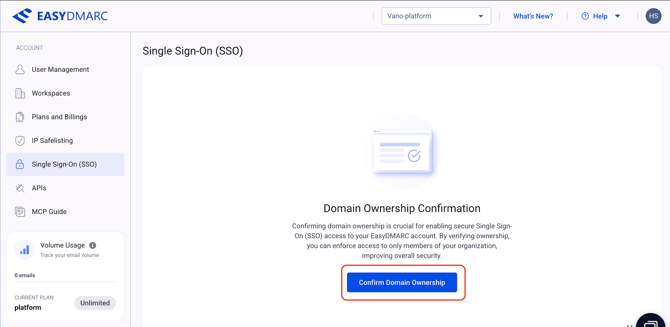
Make sure to add the provided TXT record to your DNS zone. Once added, click on the Verify button. Note that the domain you will verify does not have to be a verified domain in the EasyDMARC portal.
Note: DNS propagation may take up to several hours.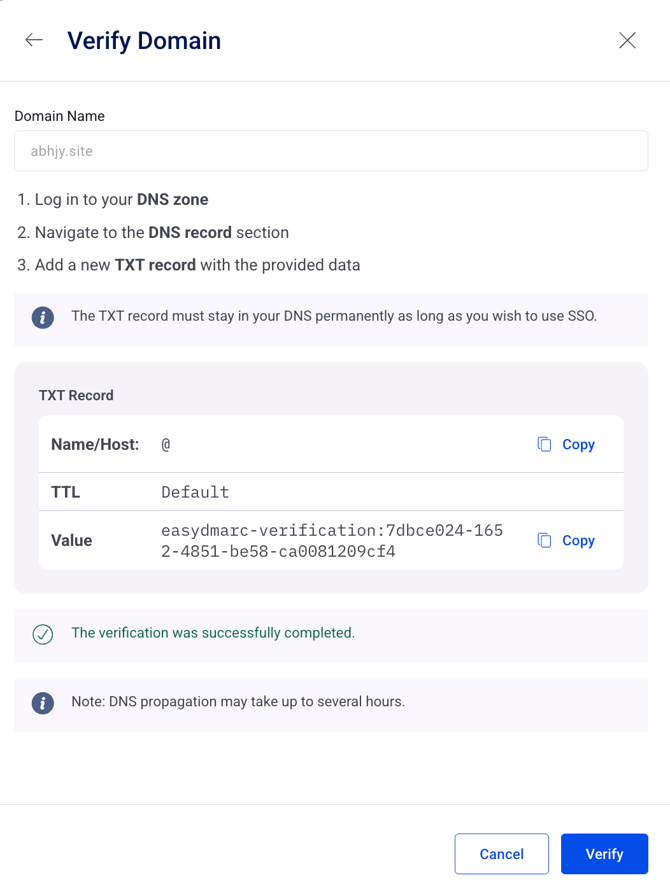
Now enter the Metadata that you’ve obtained from Microsoft Azure (either downloading the XML or copying the URL)
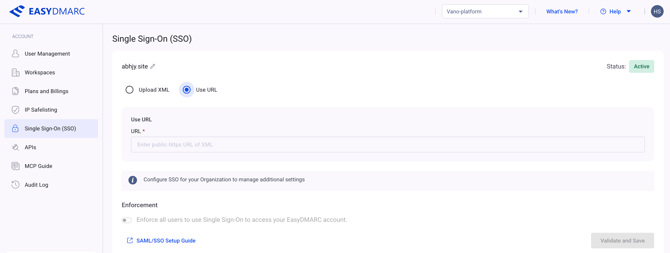
Make sure to Validate and Save
Important Note: Make sure to disable any OAuth logins by heading to Linked Accounts (Google, Microsoft, LinkedIn), and then proceed with the SSO setup.

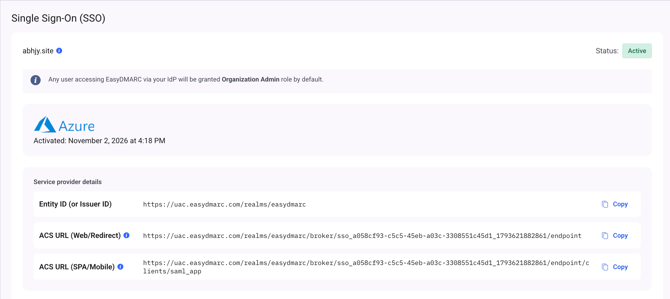
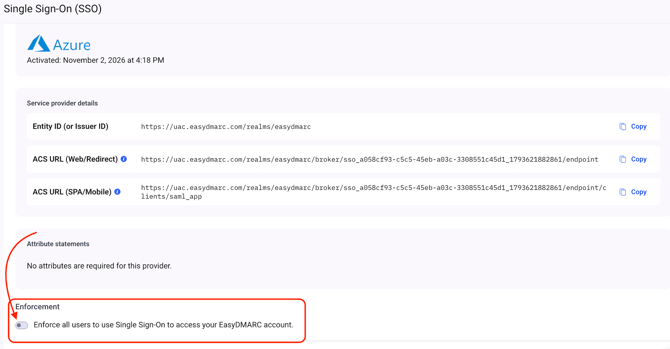
After clicking Save, you will be prompted with both the Entity ID and the Assertion Consumer Service URLs
Back in your Azure portal, search for Basic SAML Configuration, and click "Edit".
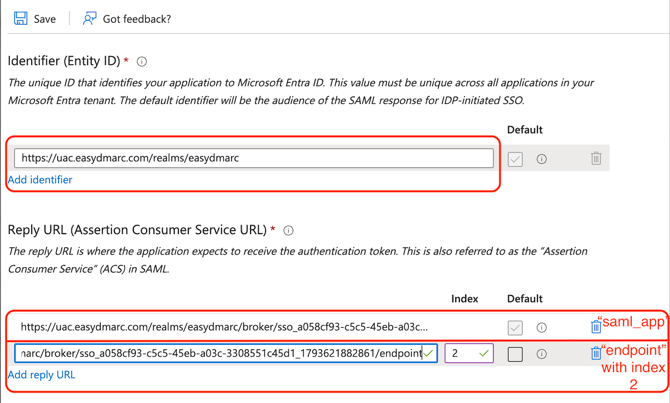
You will need to change the URLs now to the ones provided by EasyDMARC (Entity ID and Assertion Consumer Service URLs).
The previous URL was published only for us to download the Metadata XML.
Enter the information that you’ve obtained within your EasyDMARC portal Entity ID & Assertion Consumer Service URL (ACS URL) on Azure’s Basic SAML Configuration and click on Save
Note: Both Reply URLs for the Assertion Consumer Service URL are needed. One will allow you to log in via your IdP platform, and the other will allow you to log in via EasyDMARC by entering your email address. Make sure to add both of them as shown in the screenshot below.
First Reply URL must be ACS URL (SPA/Mobile) from EasyDMARC, the one which ends with saml_app with having empty index and the second one must be ACS URL (Web/Redirect), the one ending with endpoint and assigning an index of 2.
IMPORTANT NOTE: For Identifier (Entity ID), make sure to just set it as https://uac.easydmarc.com/realms/easydmarc
After setting up URLs, go to "Attributes & Claims" and click Edit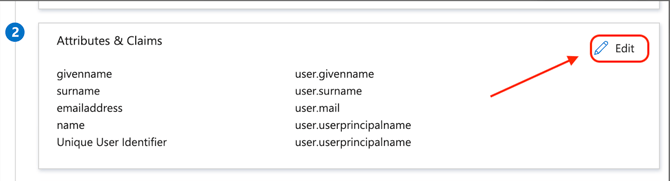
The default attributes from Microsoft will be as shown in the screenshot below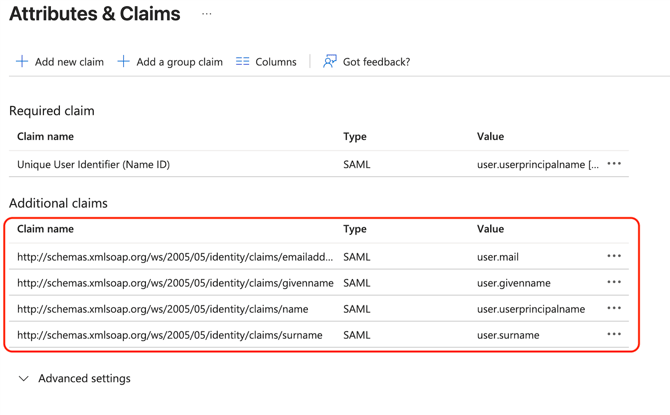
You should change it to look like this in the screenshot below by clicking on each one.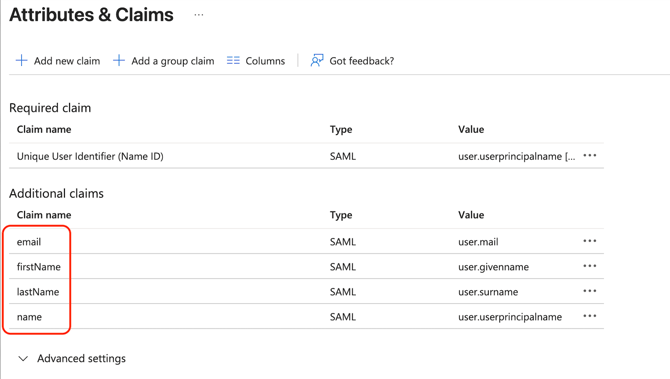
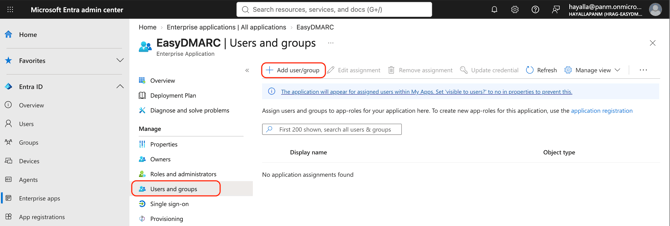
Go to Users and Groups, and Add user/group - Make sure to add any users who should have SSO access to EasyDMARC, including the administrator user with which you are currently logged into Microsoft Entra.
After completing the steps above, please follow the instructions below:
- Log out of your EasyDMARC account.
- Open an incognito/private browsing tab.
- Log in using the application created in your identity provider (IDP).
- You will be redirected to EasyDMARC, where you’ll see a prompt to link your account to SSO.
- Click the link to initiate the account linking process. (as shown in the First Screenshot)
- Check your inbox for an email from EasyDMARC (as shown in the Second Screenshot).
- Click the link in the email to complete the login.


Note: After SSO is set up, avoid using the OAuth login options (Microsoft, Google, LinkedIn) on the EasyDMARC login page. Using them may create a new, separate account. Since your login method is now SSO, simply enter your email address on the EasyDMARC login page and click “Sign in.” The system will redirect you through your configured SSO.
Please make sure to communicate this instruction internally with your team as well.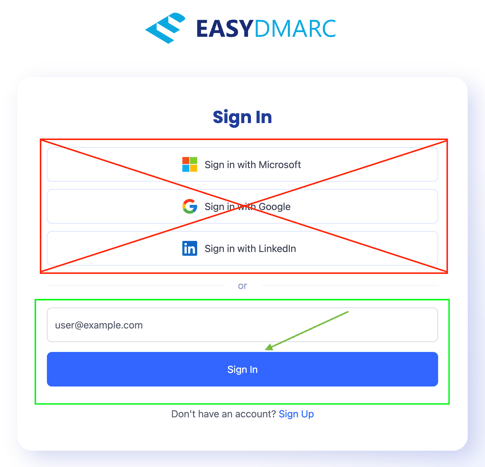
EasyDMARC Supports SCIM Provisioning with Azure, Which Can Be Set up Using This Guide.
If you encounter any limitations, please reach out to our Support Team.