Mailgun integration setup guide
Mailgun is a transactional and marketing email delivery platform designed for developers, providing APIs for sending, receiving, and tracking email, along with detailed logs and deliverability analytics for high-volume senders.
To integrate Mailgun with EasyDMARC, please check the steps below:
Prerequisites:
- An active Mailgun account.
- A verified sending domain in Mailgun with DNS records properly configured.
Required Credentials:
Field: API Key
Description: Your Mailgun API key used to authenticate API requests. Generated from the API Security page in the Mailgun Control Panel. The key is shown only once at creation.
Field: HTTP Webhook Signing Key
Description: A key used by Mailgun to sign all webhook payloads sent to your endpoints. Found on the API Security page alongside your API keys.
Important: Ensure the provided HTTP Webhook Signing Key is up to date and matches your Mailgun account's active key. Keep this field in sync with any future changes.
Setup Instructions:
Step 1: Navigate to the API Security page in Mailgun.
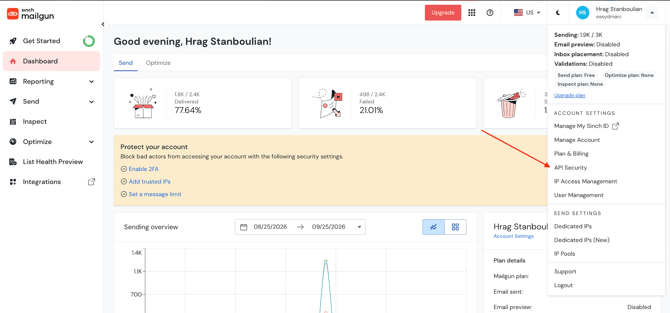
Log in to the Mailgun Control Panel at app.mailgun.com. Click your profile name in the top-right corner to open the dropdown menu, then select API Security. Alternatively, navigate directly to app.mailgun.com/app/account/security/api_keys.
Step 2: Create a new Mailgun API key.
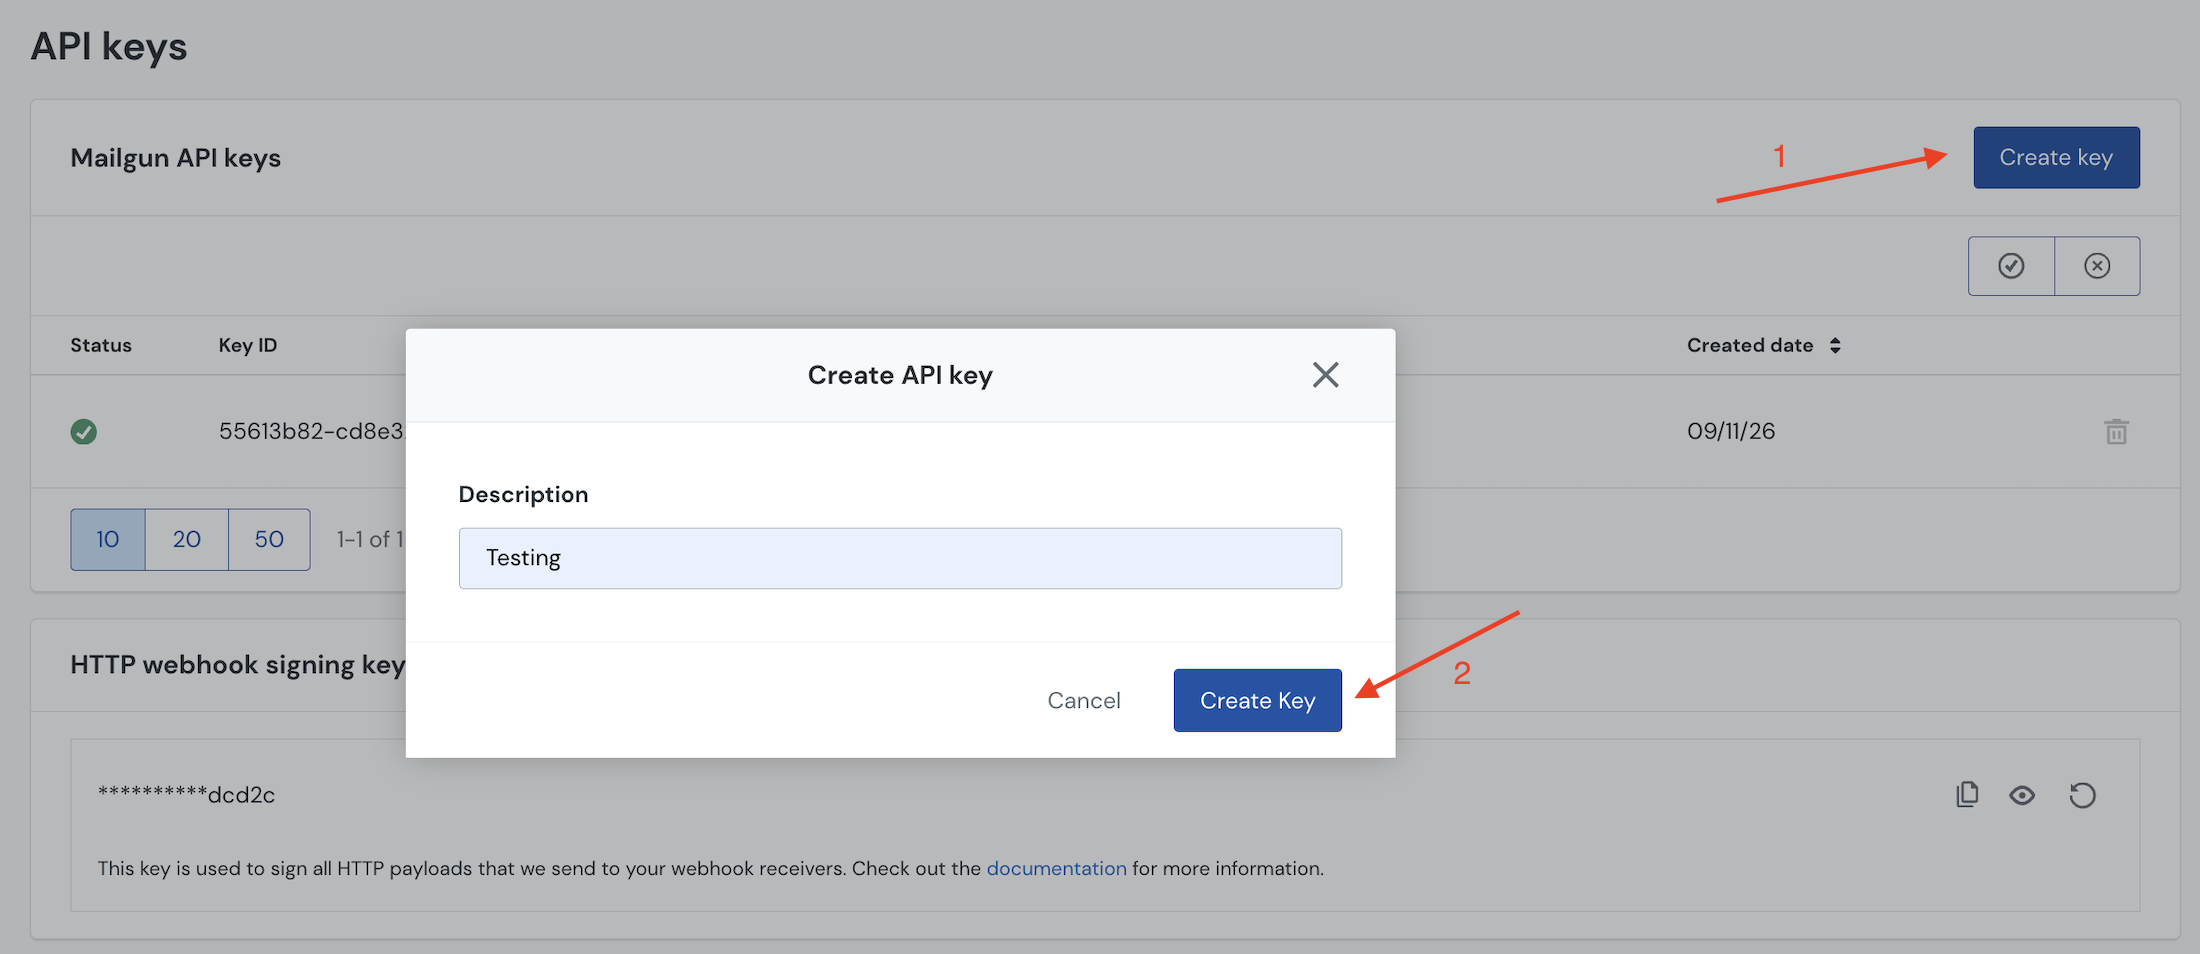
On the API Security page, locate the Mailgun API Keys section and click Add new key. Enter a description for the key (e.g., "EasyDMARC Integration"), choose a role (Admin is required for full integration access; note that Free and Basic plan accounts can only create Admin keys), and click Create Key.
Step 3: Copy your API key immediately.
The API key will be displayed in a pop-up modal. Copy it and store it in a secure location. Mailgun displays the key only once at creation — it cannot be retrieved later. If lost, you must create a new key.
Step 4: Copy your HTTP Webhook Signing Key.
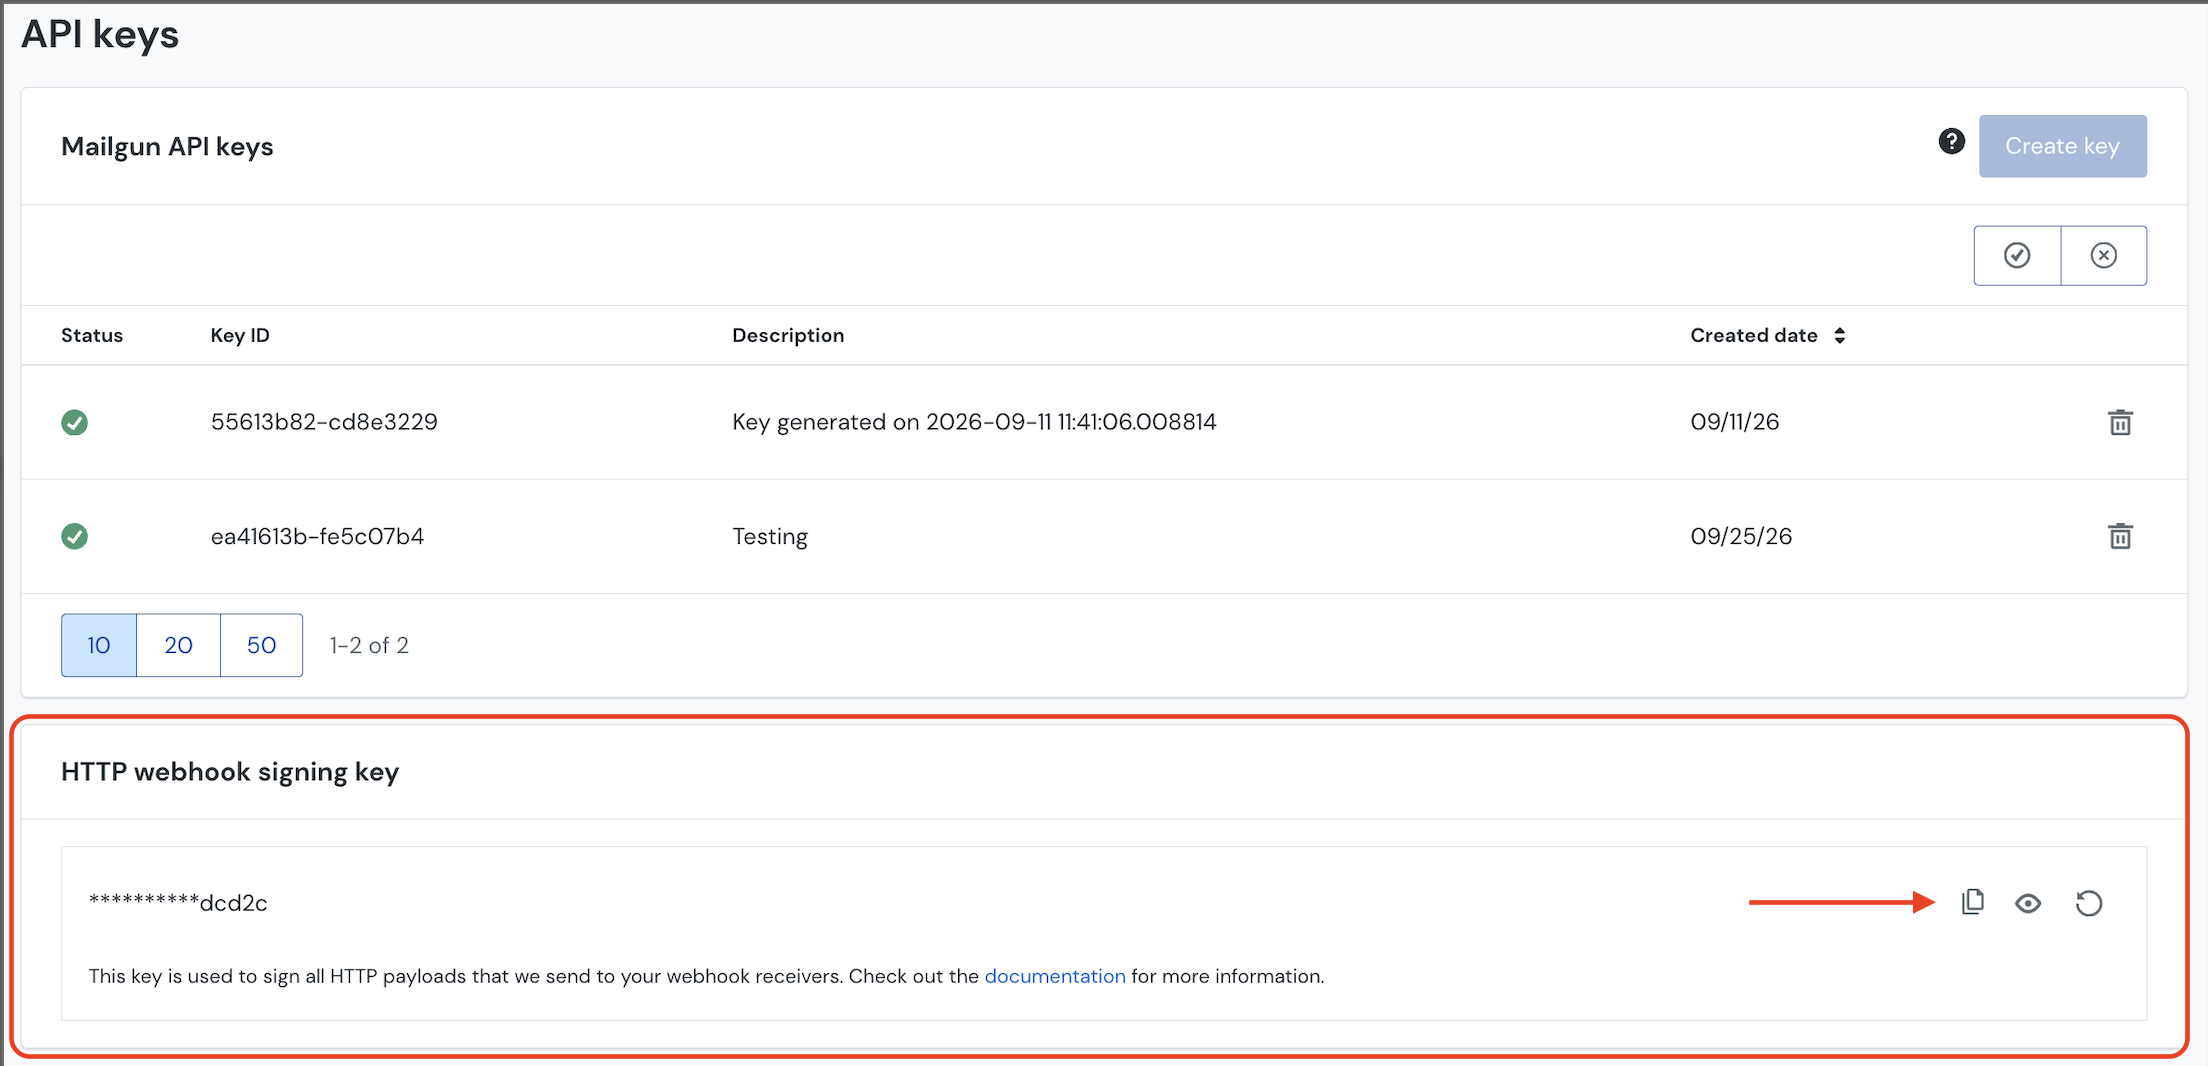
On the same API Security page, locate the HTTP Webhook Signing Key section. Click the eye icon to reveal the key, then copy it. This key is used to verify the authenticity of webhook payloads from Mailgun.
Note: The HTTP Webhook Signing Key is different from your API key. The API key authenticates your outbound API requests, while the Webhook Signing Key verifies inbound webhook deliveries from Mailgun to your application.
Step 5: Enter both credentials in EasyDMARC.
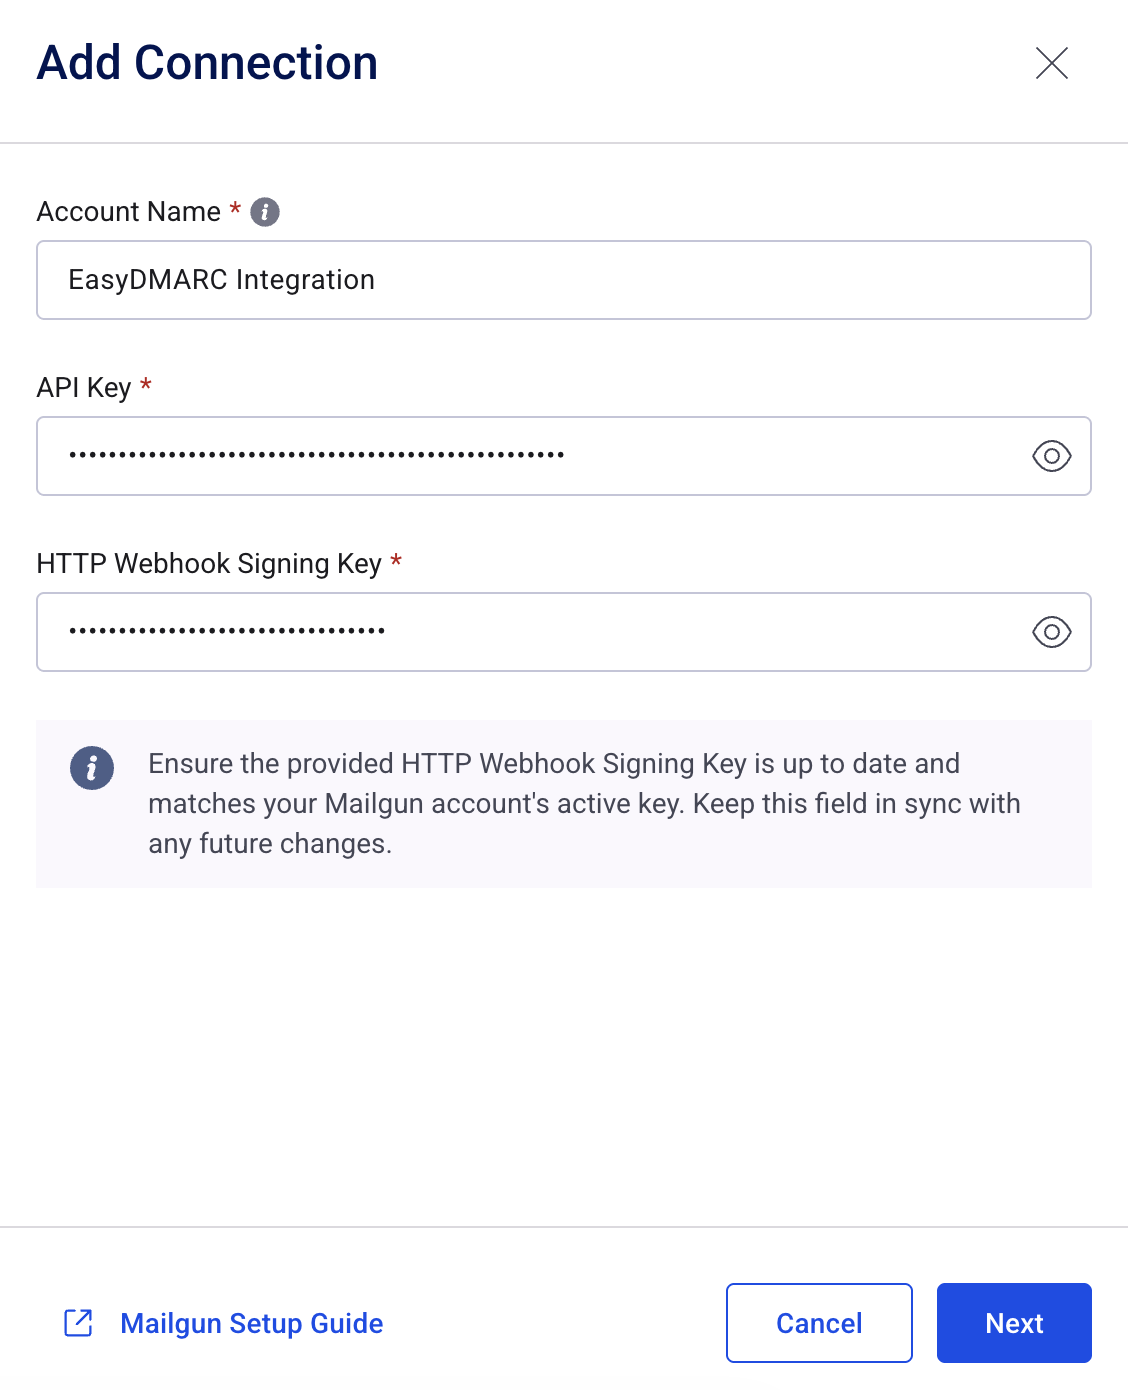
Navigate to Admin Console → Integrations → Mailgun. Paste the Mailgun API Key and the HTTP Webhook Signing Key into their respective fields and click Save.
Important: If you ever reset or regenerate your HTTP Webhook Signing Key in Mailgun (via the refresh icon on the API Security page), you must also update the key in EasyDMARC immediately. Webhook signature verification will fail if the keys are out of sync, which will prevent event data from being processed.
If there are still questions or concerns that remain uncovered after checking this article, you can contact EasyDMARC Technical Support.
To integrate Mailgun with EasyDMARC, please check the steps below:
Prerequisites:
- An active Mailgun account.
- A verified sending domain in Mailgun with DNS records properly configured.
Required Credentials:
Field: API Key
Description: Your Mailgun API key used to authenticate API requests. Generated from the API Security page in the Mailgun Control Panel. The key is shown only once at creation.
Field: HTTP Webhook Signing Key
Description: A key used by Mailgun to sign all webhook payloads sent to your endpoints. Found on the API Security page alongside your API keys.
Important: Ensure the provided HTTP Webhook Signing Key is up to date and matches your Mailgun account's active key. Keep this field in sync with any future changes.
Setup Instructions:
Step 1: Navigate to the API Security page in Mailgun.
Log in to the Mailgun Control Panel at app.mailgun.com. Click your profile name in the top-right corner to open the dropdown menu, then select API Security. Alternatively, navigate directly to app.mailgun.com/app/account/security/api_keys.
Step 2: Create a new Mailgun API key.
On the API Security page, locate the Mailgun API Keys section and click Add new key. Enter a description for the key (e.g., "EasyDMARC Integration"), choose a role (Admin is required for full integration access; note that Free and Basic plan accounts can only create Admin keys), and click Create Key.
Step 3: Copy your API key immediately.
The API key will be displayed in a pop-up modal. Copy it and store it in a secure location. Mailgun displays the key only once at creation — it cannot be retrieved later. If lost, you must create a new key.
Step 4: Copy your HTTP Webhook Signing Key.
On the same API Security page, locate the HTTP Webhook Signing Key section. Click the eye icon to reveal the key, then copy it. This key is used to verify the authenticity of webhook payloads from Mailgun.
Note: The HTTP Webhook Signing Key is different from your API key. The API key authenticates your outbound API requests, while the Webhook Signing Key verifies inbound webhook deliveries from Mailgun to your application.
Step 5: Enter both credentials in EasyDMARC.
Navigate to Admin Console → Integrations → Mailgun. Paste the Mailgun API Key and the HTTP Webhook Signing Key into their respective fields and click Save.
Important: If you ever reset or regenerate your HTTP Webhook Signing Key in Mailgun (via the refresh icon on the API Security page), you must also update the key in EasyDMARC immediately. Webhook signature verification will fail if the keys are out of sync, which will prevent event data from being processed.
If there are still questions or concerns that remain uncovered after checking this article, you can contact EasyDMARC Technical Support.